Vesa Nopanen – My Metaverse Day
Mr. Metaverse welcomes you to my Metaverse day to explore the Future Work.

The Ultimate How To Guide for Presenting Content in Microsoft Teams

Sharing / presenting content in Teams meeting is at the same time simple but is also has some options available that may not be known enough by everyone. This guide lets you get started and dive deeper what happens when you share your window, document or desktop in Microsoft Teams.
This article will be updated when there are new features or based on feedback.
Updated 22.3.2021 Presenter View section.
Community: I am happy to add Mac and iOS screenshots into the article as well if someone is willing to collaborate & provide them. 😎💪
Teams Desktop: sharing a screen (Windows)
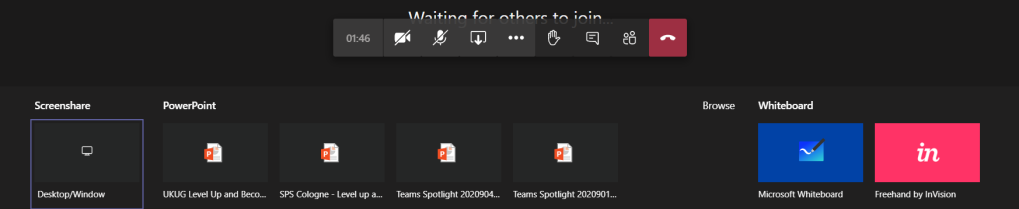
Opening the sharing with Microsoft Teams Desktop (in the New Meeting experience mode).
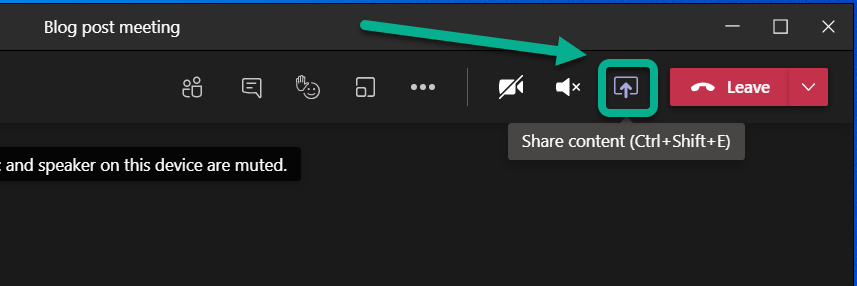
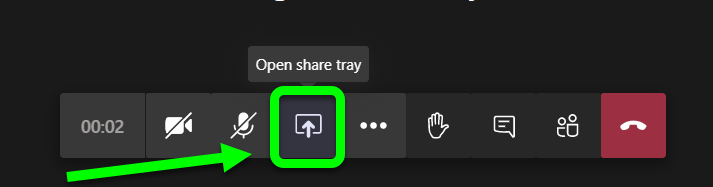
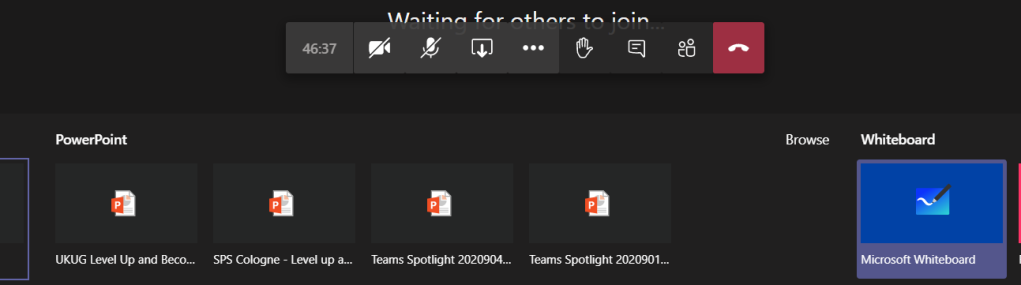
This opens the Share Tray. From it you can choose to start sharing
- Your Desktop (Screen share)
- Specific application (Window)
- Whiteboard application: either Microsoft Whiteboard (natively with Microsoft 365) or available 3rd party Whiteboards
- PowerPoint document
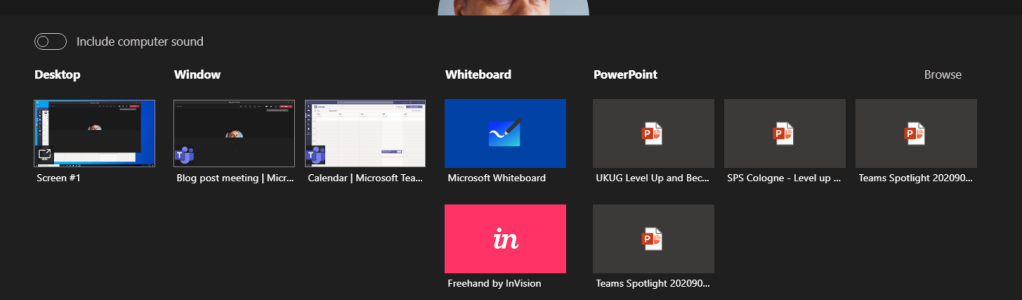
TIP: When you choose to share something using Teams Desktop you can choose to include your computer sounds to meeting. This is a must-have option if you are playing music or video to your participants. You can not toggle this on later – you need to choose this when you start sharing.
When you choose to include computer sound included with the sharing you need to have configured the speaker for computer and Teams meeting to be the same one.
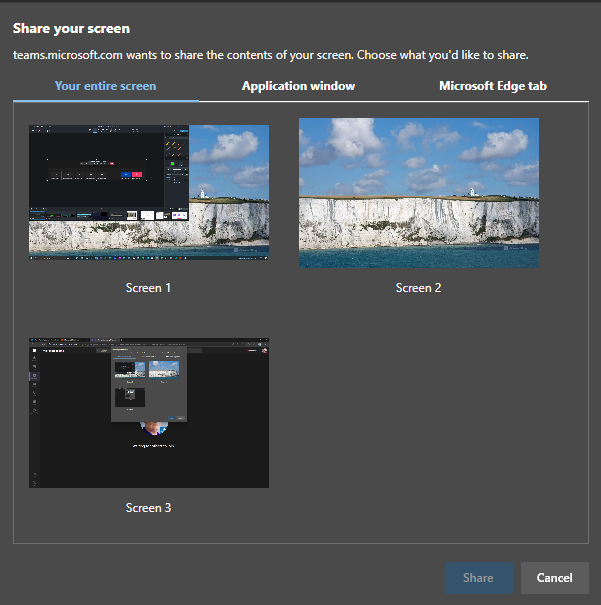
If you have multiple monitors available for your Microsoft Teams you can choose any of those displays.
And you have the sharing open. Shared area is marked with red rectangle around it. You will find the more smaller Teams meeting control window in one of your desktops – and if you have the camera on it will show the video.
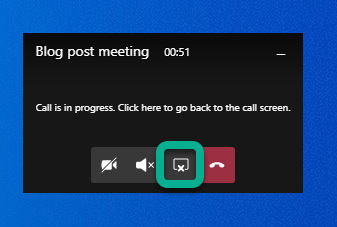
But more importantly you can use that small window to control camera, audio or sharing (ending it with one press). Or you can click on the small window (not on meeting toolbar) and it will expand back to the full size.

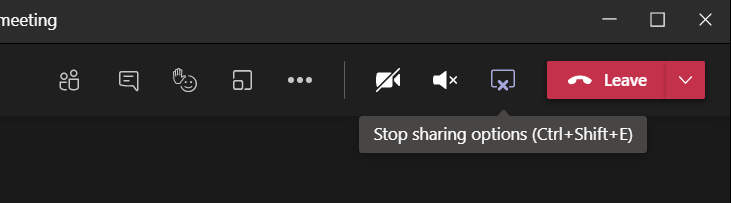
You can use that same icon to stop sharing in the expanded window.
Tip: If you have two screens available you should consider presenting your PowerPoint presentation so that you share the external screen and project your presentation there (PowerPoint – Slide Show – Monitor). Share that external screen to Teams meeting so you can be sure that whatever you show in that screen it is shown to attendees. Just check that your second screen is not a ultra-wide display or 8k (or preferably even 4k) because the content is going to be tough to read and view by attendees. FullHD screen works the best here.
Tip2: when you are presenting PowerPoint in external screen (and sharing that to Teams meeting) do they advantage of inking and pen if you are using a device with touch screen (like Surface)!
Tip3: if you have an embedded video in your PowerPoint and you use screen/display sharing to present it to the audience: Don’t forget include computer sound with your share!
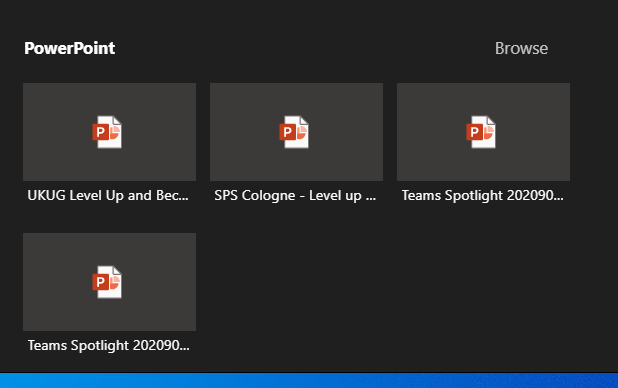
Teams Desktop: sharing a PowerPoint
You can choose from your recent PowerPoint documents in the list
- A PowerPoint document you opened or edited in Microsoft Teams (in a team you belong to) or in your OneDrive
- Browse for more
This list of sharing PowerPoints is causing often some big questions. PowerPoints will appear in the list once you edit or open the PowerPoint presentation in Teams or OneDrive (there may be some short delay). Generally it applies to the next meeting you join. Make sure you prepare for the meeting by opening the document in advance. Simply uploading a presentation to OneDrive or Teams does not bring it to the list – you need to open/edit it as well.
Browse-option lets you choose a PowerPoint from your OneDrive or from your computer.

What this one lacks is the ability to choose a file from a team you belong to.
TIP: Use OneDrive syncing to have an easy access to files in the most relevant teams you belong to .
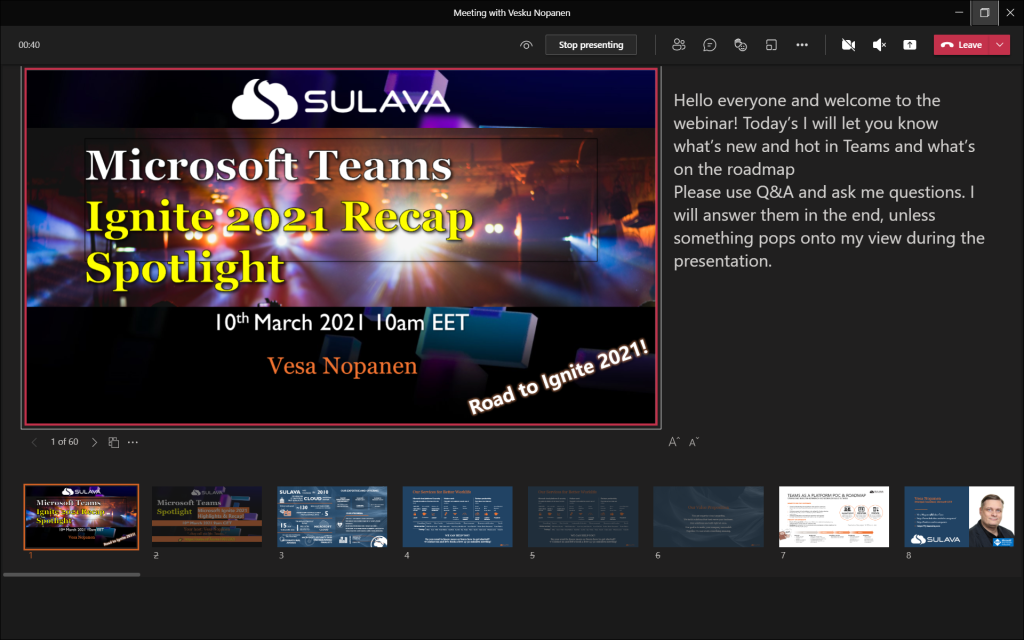
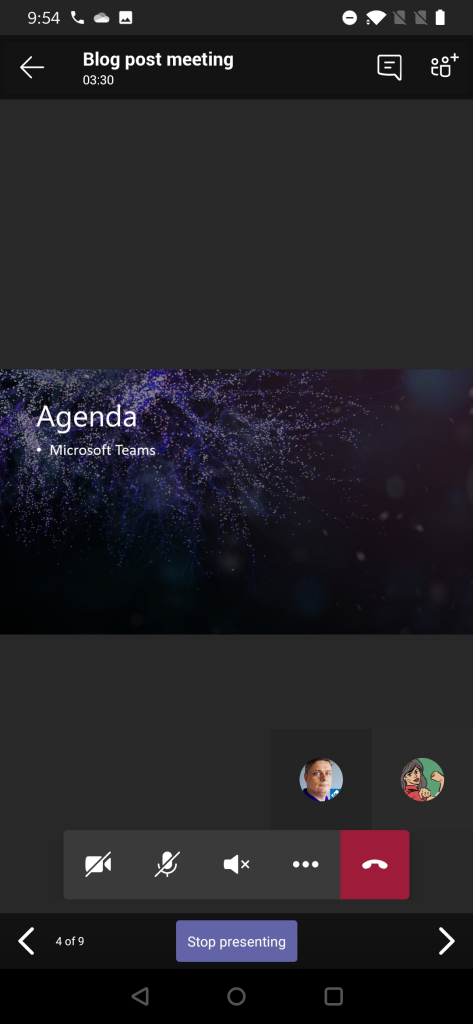
Once you are sharing the PowerPoint you can see it in the presenter view mode! This feature is generally available ! This makes it easy to do presentations using Teams – without having to have a PowerPoint desktop app open at the same time. Seems to work only on Teams Desktop with new meeting experience mode at the moment.
The presented area (PowerPoint) is shown surrounded with a red rectangle.
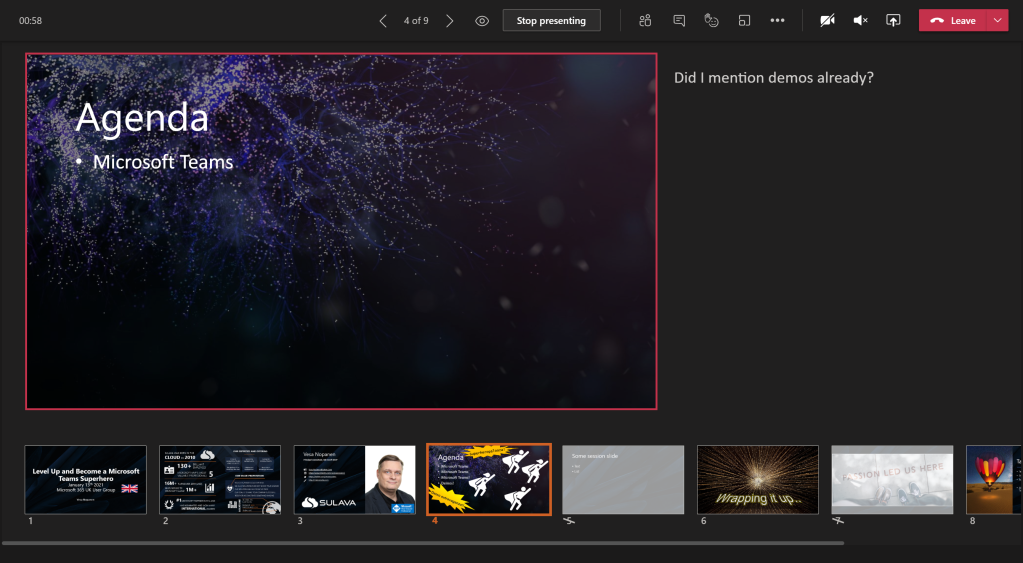
Updated 22.3.2021. There are other controls in this as well for jumping between slides and accessibility controls.
I have a another article diving deeper to Presenter view in here !
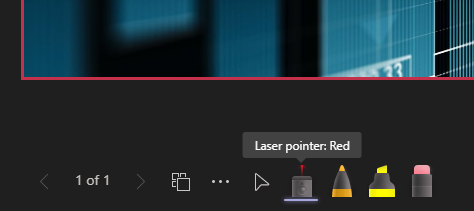
NEW: PowerPoint Live has now laser pointer and inking capabilities. Read about them here !
Once the presentation is shared you can move back and forth easily with arrows in the screen.

Note: there is the “eye” icon. If you press that one it locks the PowerPoint for the participants so that they see the same slide as you do: they can not browse the deck on their own. This is called private viewing disable (arrows for other participants will be disabled). Private viewing is enabled on default.

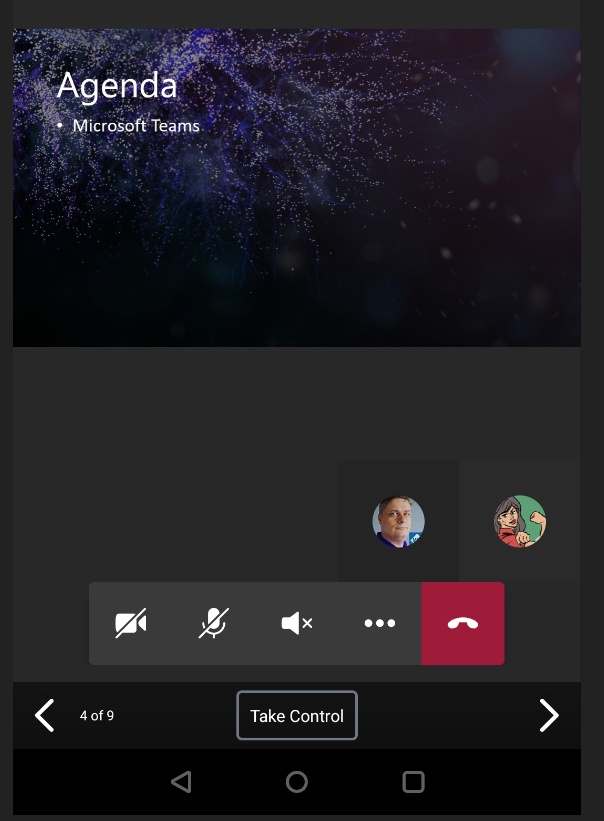
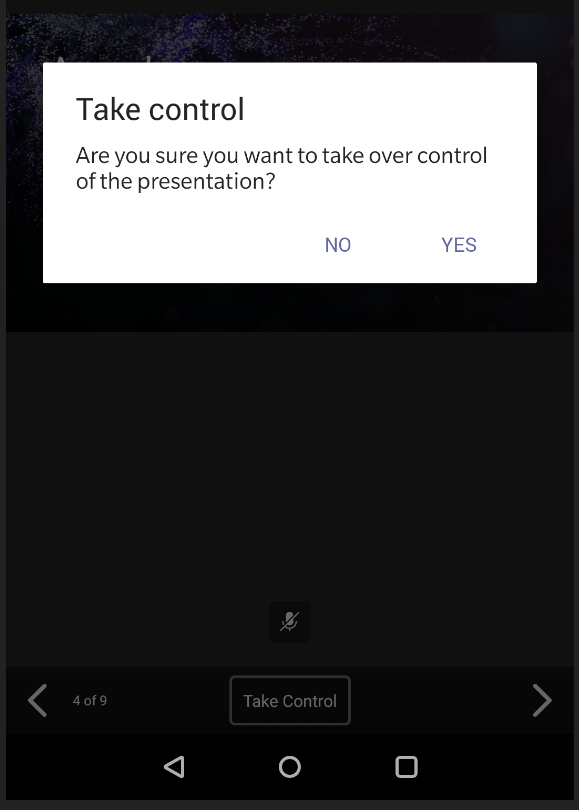
Note: if you are a presenter in the meeting where a PowerPoint is shared to you can take control of the shared PowerPoint to advance slides. This does not ask for any confirmation and the feature is really useful when you have multiple presenters who use the same slide deck. Just be careful that everyone else are not presenters – or they know not to touch it.

You will get a warning that someone has taken the control and can easily take it back.

Whoever is in control of the presentation has also the control to disable/enable private viewing mode. As can be seen in the picture above (with Take control) the eye is missing and arrows are greyed out: this means someone else than you have the control and they have disable the private viewing.
Note: When you share PowerPoint to a meeting this way participants can click links you have in your presentation. Thank you Joe for this reminder!

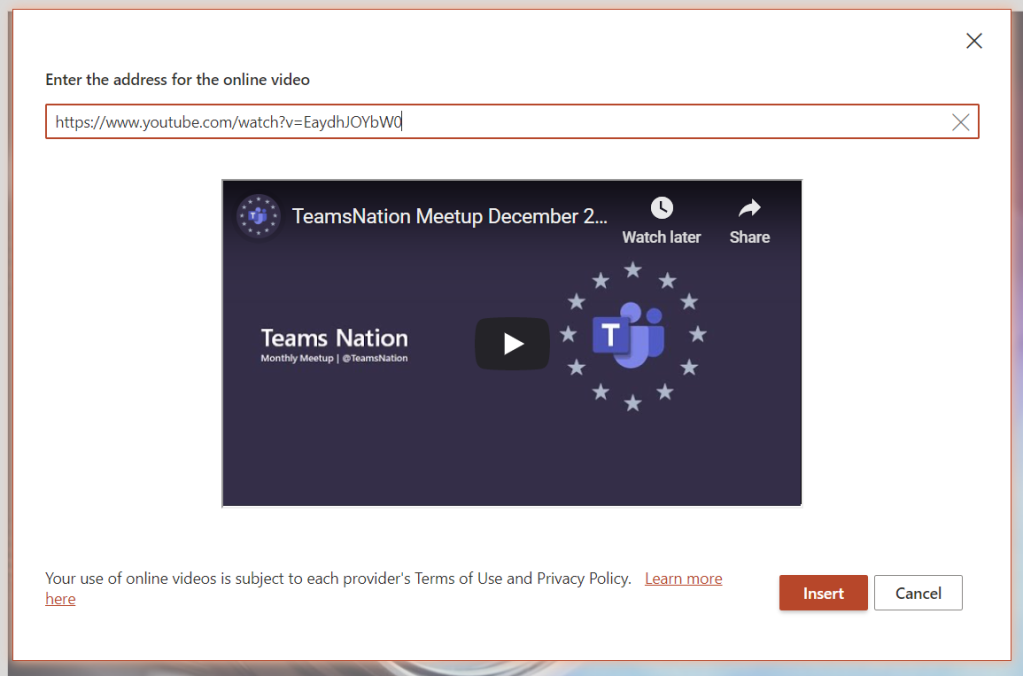
If you add a online video to your presentation your participants can activate that on their own as well. It is good also to note that if you hit “play” it doesn’t reflect to attendees (=they need to play the video themselves)
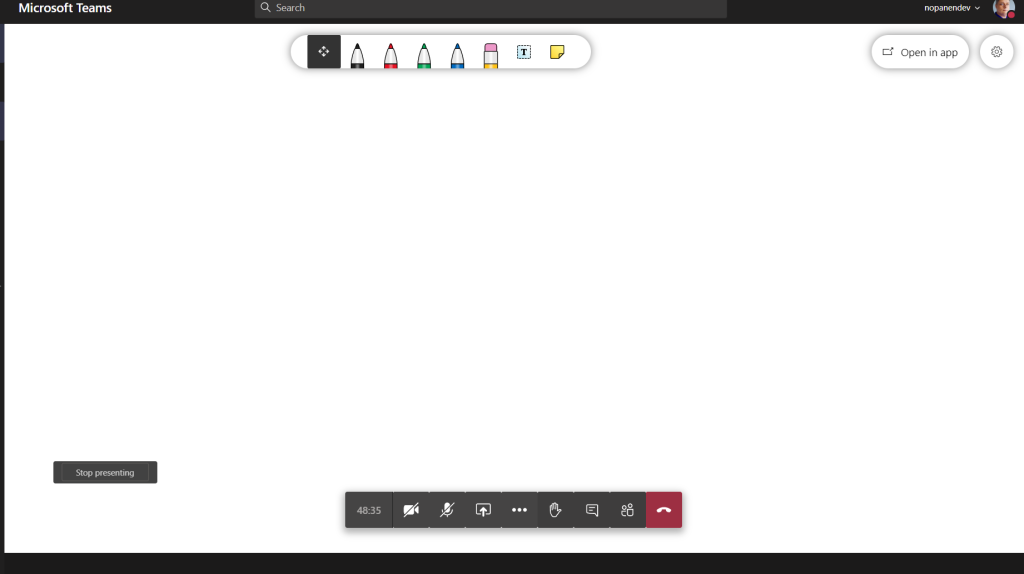
Teams Desktop: sharing a Whiteboard
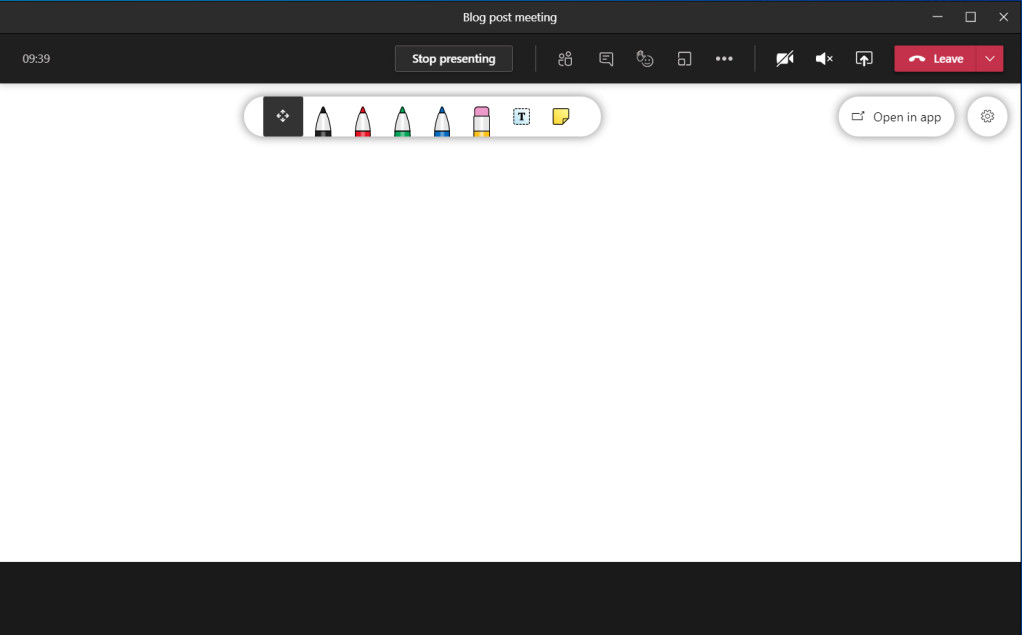
When you choose Microsoft Whiteboard from the Share Tray you are taken directly to the Whiteboard view. Everyone who is in the same organization as you are (the situation in January 2021) can co-author the Whiteboard with you. Once you are done you can Stop presenting (middle top screen) or share something else.
Teams web client: sharing a screen (Microsoft Edge)
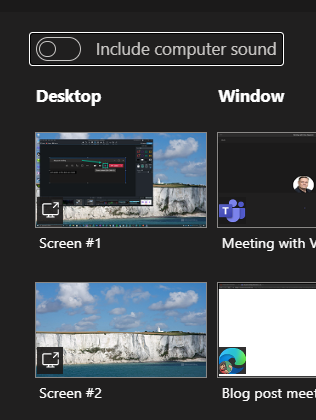
Sharing looks a bit different when you are using Teams web client. Sharing is available in (new) Microsoft Edge and Google Chrome browsers. The toolbar is hovering on top of the meeting. From the toolbar you can open the share tray.
When you have the share tray open you can choose to share something of following
- Desktop (Screenshare)
- A specific PowerPoint document
- Whiteboard: either Microsoft Whiteboard or Freehand (3rd party).
- Entire screen
- Application window (a specific application only)
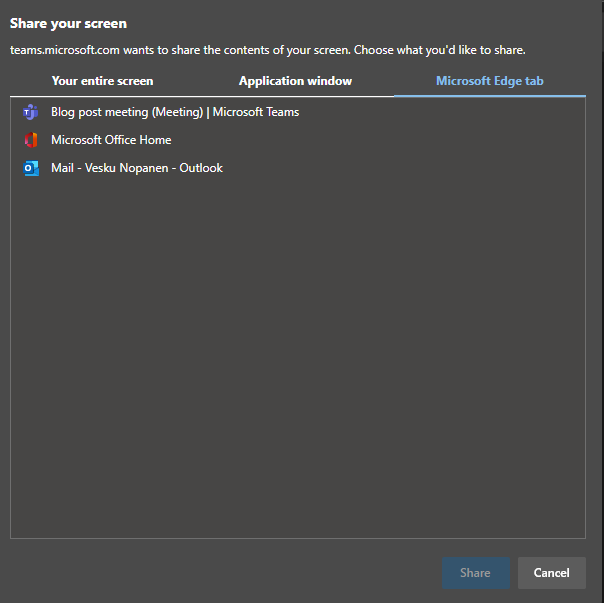
- With Microsoft Edge you have option to choose a selected, specific, tab
When(if) you have multiple monitors it is easiest to just share a one of them: it makes the sharing really simple and easy to manage: anything on that display is shared.
If you don’t have multiple monitors then you might want to just share a single application.
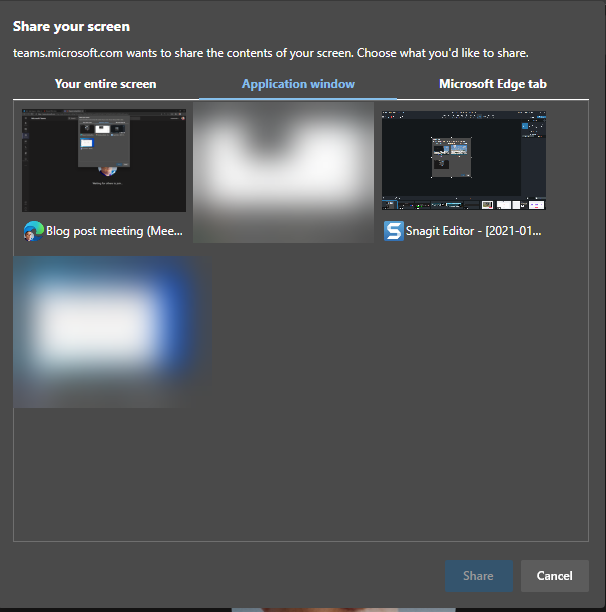
This is useful when you want to show something specific that runs in it’s own application but you can not share anything else on your screen.
Note: Teams is not in the list (not even on blurred ones) and nor is Spotify or ToDo. Not every application can be shared with this.
Note2: you can not share desktop audio to the meeting using Teams web client.
And the last option is to share a selected Edge tab – and if you have multiple Edge profiles open you can share from any of those by clicking the desired Edge active and choosing the tab.
In my example I chose to share one of my screens. You don’t get much feedback – you just click on the screen and hit Share. In one of your screens you will have this toolbar:

You can end sharing using either that toolbar or you can navigate to your web Teams meeting and choose Stop sharing from the toolbar there.

Teams web client: sharing a PowerPoint
This list of sharing PowerPoints is causing often some big questions. PowerPoint presentations will be in the list once you edit or open the PowerPoint presentation in Teams or OneDrive (there may be some short delay). Generally it applies to the next meeting you join. Make sure you prepare for the meeting by opening the document in advance. Simply uploading a presentation to OneDrive or Teams does not bring it to the list – you need to open/edit it as well.

Note: there is the “eye” icon. If you press that one it locks the PowerPoint for the participants so that they see the same slide as you do: they can not browse the deck on their own. This is called private viewing disable. Private viewing is enabled on default.

Whoever is in control of the presentation has also the control to disable/enable private viewing mode.
Teams web client: sharing a Whiteboard
Sharing a Whiteboard is initiated simply by choosing Microsoft Whiteboard (or Freehand or other available 3rd party application) from the share tray.
I have found out that sometimes when you start sharing Microsoft Whiteboard to the meeting using Teams web client it doesn’t do anything. The solution is to try again.
Once the Whiteboard opens you can work on it normally – or choose to open it in the Whiteboard app to have a broader set of tools available.
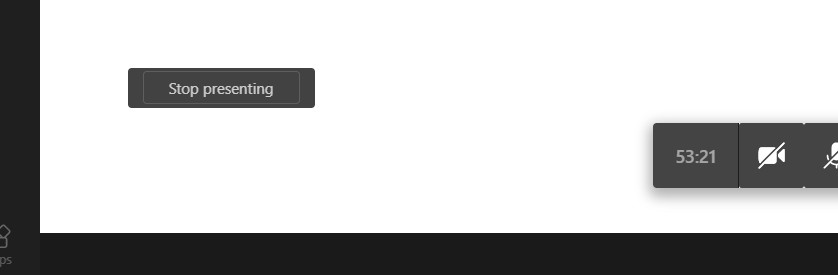
When you are done you can choose the “Stop presenting” that is hovering on the left bottom area (left of meeting toolbar).
Teams mobile: sharing a screen
Were you aware that you can also share content using your mobile device? I have examples and screenshots using a Android device but these also work with iOS – the user interface might be slightly different.
You initiate the sharing via … menu selection in the mobile to open the list of options
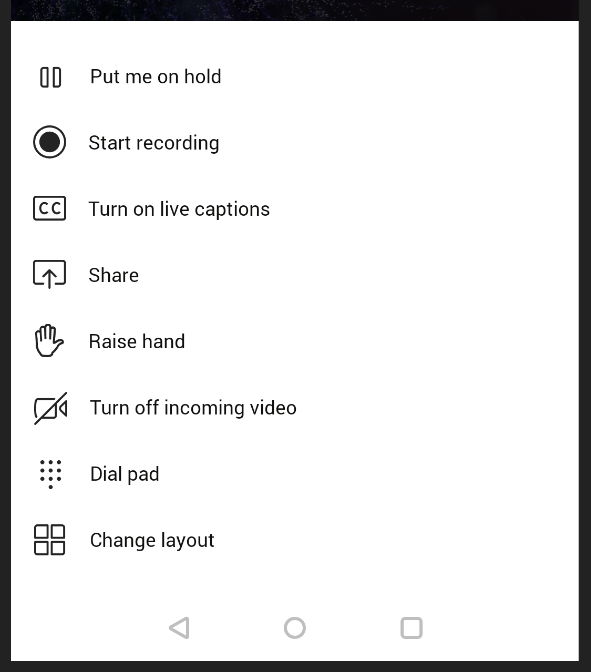
You choose Share and you get to choose what to share
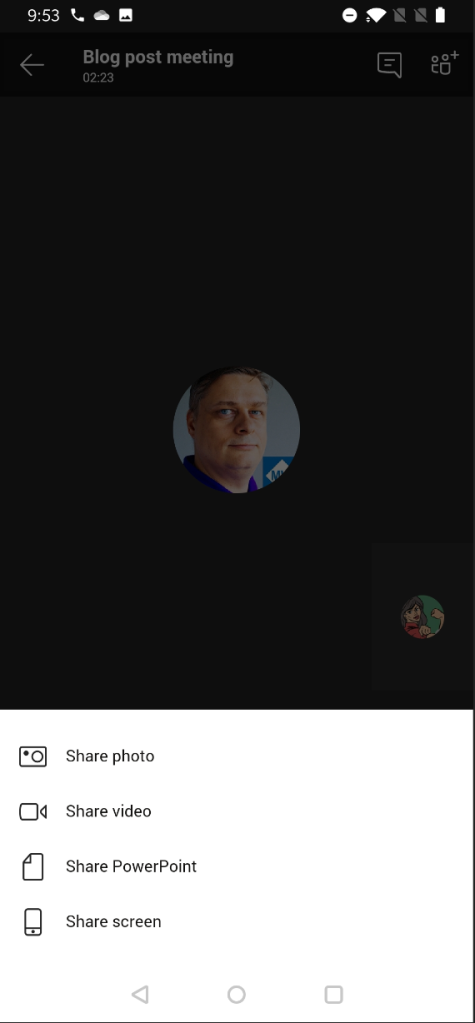
Yes – you can share your mobile device screen to the meeting. This is really useful if you have a application you want to show or train to others.
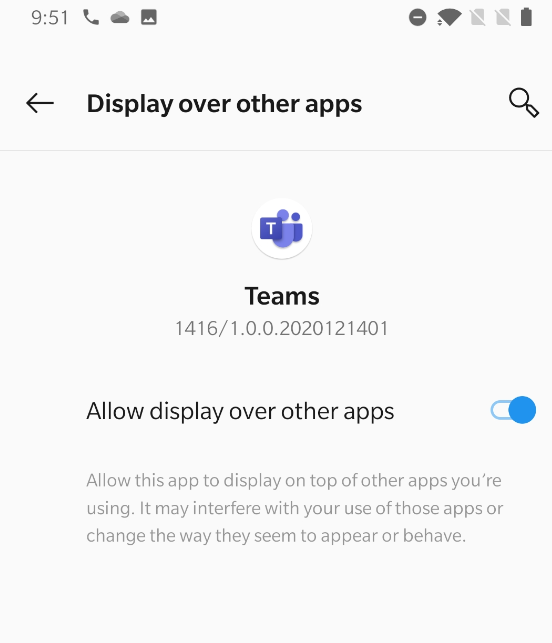
You may have to adjust settings to turn on allowing Teams to display over other apps.
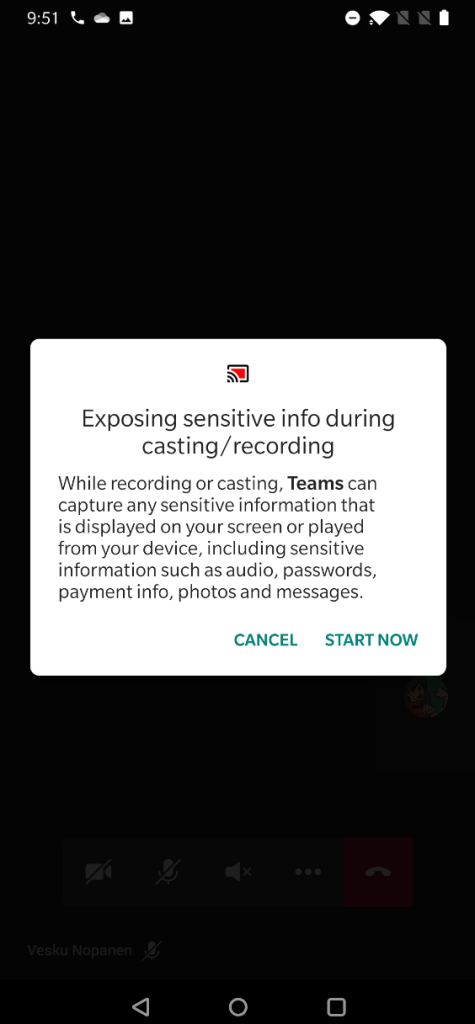
After that one you may have reshare the screen. And you get the next warning.
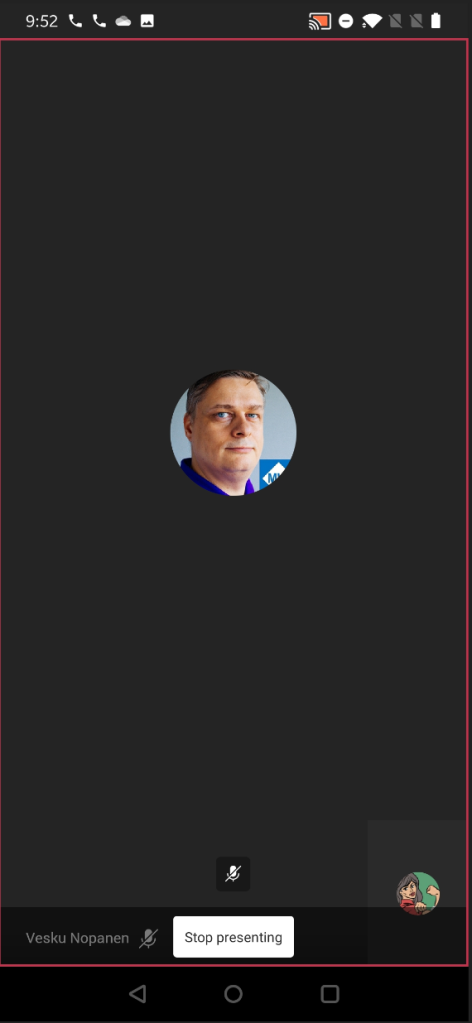
And your screen is now shared. You can see the red block that lets you know what are of your mobile device screen has been shared.
And if you pull down notifications area you have option to return to Teams meeting (if you have been using some other app) and there is also the notification that you are sharing your screen.
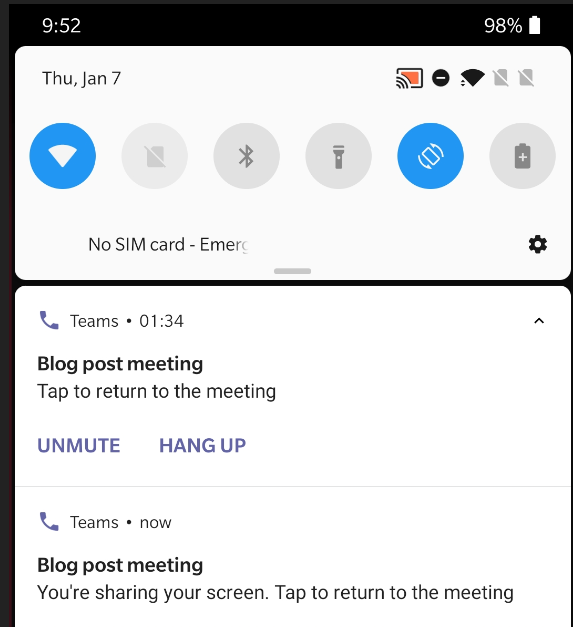
When you are done sharing you can return to Teams meeting and then choose to Stop presenting.
Teams mobile: sharing a PowerPoint
Sharing a PowerPoint works really well on Teams mobile! It is in fact even better than the version in other clients.
You start by imitating the sharing (as with screen share) and choosing the PowerPoint instead. You get a screen:
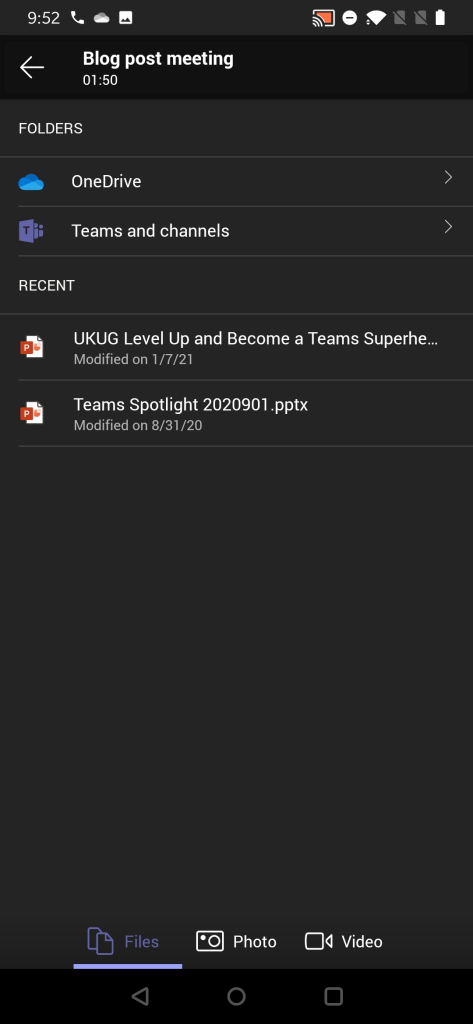
From this screen you can choose to browser thought
- A PowerPoint presentation from any Team and channel you belong to!
- Choose a PowerPoint presentation you opened or edited most recently (as you notice compared to other examples that this isn’t 1:1 in sync.. There are differences so that is why I am really happy that you can browse through Teams for sharing)
Once you have selected the PowerPoint to present it is very straight forward from that moment.
Using Teams mobile you can also take control of a PowerPoint someone else is presenting (if you are a presenter in the meeting). This means that you can participate in a multi-presenter meeting quite easily by using just your mobile device and Teams!
You will get a warning before you take the control – in case you pressed Take Control accidentally.
Teams mobile: sharing a photo or video
Follow the steps laid out earlier and instead of screen or PowerPoint you select this time a picture (from device’s picture gallery) or a video (using device’s video camera). Since sharing a picture is very straight forward I use the video instead as example.
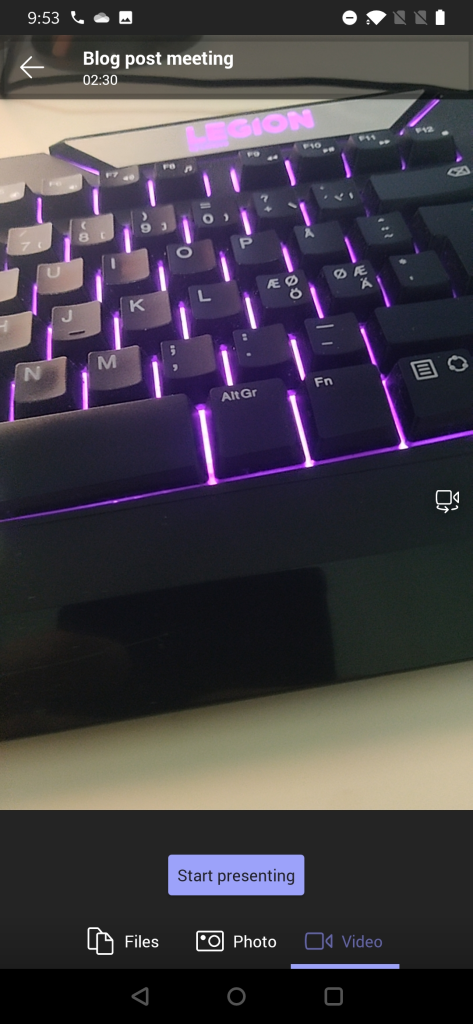
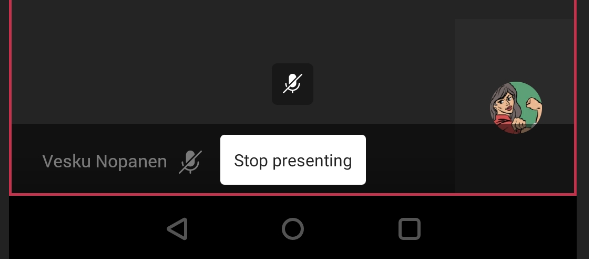
You get to see a preview of video first. You can switch to other camera (front/back usually) & position the device properly and once you are ready you just hit Start presenting .
And when you are done you can press on “Stop presenting” to end your video feed.
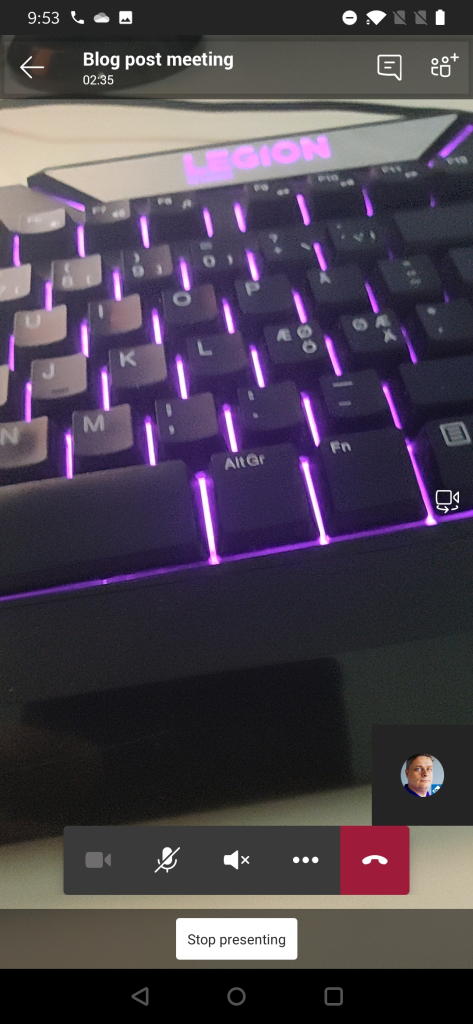
This video is different from showing your own video using Camera icon the meeting toolbar. Instead of being a attendee video this one is shown in the shared area for every participant in the meeting. This is useful when you have something in the same room/space that you want to share to others in the meeting. Possible use cases: a model on table, physical whiteboard, view from the window, interviewing someone, view in the outside, …
Best practices from my experience
The way I use to share content when in Microsoft Teams meetings is
- I share one of my screens (I have three screens so this is a natural choice for me). This way I know what is being shared all the time since I always share the same screen (the one in the middle, my camera is on top of that screen). Be careful what you drag to the shared screen. This is the way I share my PowerPoint presentations (projecting the presentation to the shared screen)
- If you have a touch-screen device (like Surface-laptop) you should use pen/inking to enhance the presentation experience. This also works when you are sharing the external screen & presenting from touch-screen device: make your presentation stand out!
- Prepare the content you share in advance. Open PowerPoints, apps, browsers etc so you don’t have to spend any time with them when you are live.
- Share your screen early rather than later. This will give you time to reshare.
- When doing a presentation with multiple persons using just the PowerPoint deck share it directly to Teams meeting so you can switch between speakers easily. With the new Presenter view -support this is now a good option.
- Make use of Teams features: Put everyone but real presenters else as attendee so they can’t start sharing their screen accidentally – and you can hard mute them as well. Use meeting options -setting before they join in.
- When people complain they don’t see the share: check that you are actually sharing your screen. If someone is seeing your share and some others not: those who can’t see your share need to leave and rejoin the meeting. Sometimes restarting your sharing can fix that issue too but usually the issue is in the participant end.
- I rarely use application / window -sharing.
- Sharing a video in Teams meeting (or in Live event) is usually ok but you can expect some quality drop – especially if you have a lower bandwidth. Have a backup link to the video available. People seem to struggle more with videos embedded inside a PowerPoint.
- Use Windows Focus Assist and Teams Do Not Disturb mode so you don’t get any unwanted popups on your shared screen. Microsoft Teams will also have a upcoming feature (currently usable in public preview) that let’s users to choose if Teams notifications do their own “toast” (pop-up banner) or do they go directly to Windows notification area (honoring the Focust Assist setting).
- Use Teams Desktop version + new meeting experience when possible. Check that you have the latest version.
More information or different view into this?
Check out Microsoft Support article about Sharing content in Microsoft Teams meetings .
I hope you have enjoyed this guide and it has provided to be useful. Please do drop a comment from below if you have any questions or you want to send me greetings!
Sharing is Caring! #CommunityRocks
Aiheeseen liittyy.

Published by Vesa Nopanen
Vesa "Vesku" Nopanen, Principal Consultant and Microsoft MVP (M365 and AI Platform) working on Future Work at Sulava. I work, blog and speak about Future Work : AI, Microsoft 365, Copilot, Microsoft Mesh, Metaverse, and other services & platforms in the cloud connecting digital and physical and people together. I have about 30 years of experience in IT business on multiple industries, domains, and roles. View all posts by Vesa Nopanen
5 thoughts on “ The Ultimate How To Guide for Presenting Content in Microsoft Teams ”
- Pingback: Dew Drop – January 18, 2021 (#3361) – Morning Dew by Alvin Ashcraft
- Pingback: [m365weekly] #19 – M365 Weekly Newsletter
- Pingback: PowerPoint Live / Presenter View in Microsoft Teams – Vesa Nopanen – My Teams & Microsoft 365 Day
- Pingback: PowerPoint Live / Presenter View in Microsoft Teams - Tech Daily Chronicle
- Pingback: Microsoft Tech News and Product Updates: 4/26/2021 – Mr. Wombat
Leave a comment Cancel reply
This site uses Akismet to reduce spam. Learn how your comment data is processed .

- Already have a WordPress.com account? Log in now.
- Subscribe Subscribed
- Copy shortlink
- Report this content
- View post in Reader
- Manage subscriptions
- Collapse this bar

Apr 6, 2021
Try presenting in Teams meetings from PowerPoint
- Add our blog to your RSS feed reader" href="/rss/blog.xml" data-bi-name="RSS Subscription" data-bi-id="rss_feed" data-bi-bhvr="120" data-bi-socchn="RSSSubscription" title="Microsoft 365 Insider Blog RSS" target="blank" class="d-inline-block">
Hello Office Insiders, I’m Lishan Yu, a program manager on the PowerPoint team. You might have heard that we announced the PowerPoint Live in Teams feature at Microsoft Ignite last month. Today, I’m excited to show you how to check out this new experience, and start presenting in Teams meetings from PowerPoint.
Presenting in Teams meetings
Presenting in a meeting used to be as simple as clicking Slide Show in your PowerPoint deck. Nowadays, even though you may not be in the same room as your audience, we believe your flow to present should be as easy and intuitive – clicking the Present in Teams button in PowerPoint is the only step you need to take to present the deck in your Teams meeting!
How it works
Give the feature a try next time you need to present in a Teams meetings:
- Join a Teams meeting or an ad-hoc Teams call.
- Open your presentation in PowerPoint for Windows.
- Click the Present in Teams button in the top right corner.

Scenarios to try
Ready to take the PowerPoint Live feature for a spin? Try some of the scenarios below.
As a presenter :
- After clicking the Present in Teams button in PowerPoint, notice that you can see both the chat and your content at the same time in Teams (and don’t feel like you’re missing out on the discussion).
- Take advantage of features like grid review and slide notes to present more effectively.
As an audience member :
- If you joined late, move back through the deck and quickly catch up without having to ask the presenter to stop and recap what was already shared.
- Interact with and experience the richness of the content being presented such as better video quality, live web links, and more.
- Make any adjustments you need to more fully enjoy the presentation (i.e., use high-contrast mode).
Requirements
In order to try out the feature, you will need to:
- Have the latest Teams desktop app installed.
- Store the presentation on OneDrive for Business or SharePoint.
- Join a Teams meeting before clicking the Present in Teams button in PowerPoint for Windows.
- Be using an Office 365 E3/A3, Office 365 E5/A5, or Microsoft 365 for Government license.
Availability
This feature is rolling out over the next several days to Insiders running Beta Channel Version 2104 (Build 13926.20000) and later.
We’d love your feedback, so please let us know how you think. To get in touch, do either of the following:
- Inside the app, select the Help button in the top-right corner of the app.
- Respond to this post or tweet at @OfficeInsider .
Learn what other information you should include in your feedback to ensure it’s actionable and reaches the right people. We’re excited to hear from you!
Sign up for the Office Insider newsletter and get the latest information about Insider features in your inbox once a month!
Sorry, JavaScript must be enabled to use this app.
- Generative AI
- Office Suites
- Collaboration Software
- Productivity Software
- Augmented Reality
- Emerging Technology
- Remote Work
- Artificial Intelligence
- Operating Systems
- IT Leadership
- IT Management
- IT Operations
- Cloud Computing
- Computers and Peripherals
- Data Center
- Enterprise Applications
- Vendors and Providers
- Enterprise Buyer’s Guides
- United States
- Netherlands
- United Kingdom
- New Zealand
- Newsletters
- Foundry Careers
- Terms of Service
- Privacy Policy
- Cookie Policy
- Copyright Notice
- Member Preferences
- About AdChoices
- E-commerce Affiliate Relationships
- Your California Privacy Rights
Our Network
- Network World
14 best practices for Microsoft Teams video meetings
Here’s what to do before, during and after leading a video call in microsoft teams to ensure a beneficial experience for all..

It’s easy to start a video meeting in Microsoft Teams, but there are ways to enhance the experience for you and the other attendees, whether it’s an informal video chat with co-workers, a presentation to a client, or a department-wide quarterly update. Here’s how you can get the most out of video meetings in Teams — best practices for before, during, and after your meeting.
This story is primarily for users whose organizations have a subscription to a Microsoft 365 or Office 365 business or enterprise plan. Although Microsoft offers subscriptions tailored for home users, as well as a free version of Teams, these don’t include many of the features covered in this story. Also note that these instructions describe the Teams desktop app; some features are not available in the web or mobile versions. ( Here’s a look at how Teams compares to rivals .)
Before the meeting
To schedule a video meeting in Teams, click the Calendar icon on the left toolbar. This brings up a calendar in the main window. Click the New meeting button at the upper-right corner.
A fill-out form will appear in the main window. Type in a title for your meeting.
In the Add required attendees box, type in the email addresses of the people who you want to attend your meeting — or, if your organization’s address book is integrated with Teams, you can just start typing co-workers’ names (or the names of corporate email lists) and select them from the list that appears. If you want to invite people without making them feel that they’re required to attend, click +Optional at the right end of the required attendees field and add their names in the Optional field that appears below.

Scheduling a meeting in Teams is straightforward and integrates with Microsoft 365 contacts and calendaring. (Click image to enlarge it.)
Then in the fill-in boxes below, choose a date, a start time, and an end time for your video meeting. Click the Save button at the upper-right corner, and your invitation will be sent to these people with a link to join the meeting in Teams.
This covers the basics for inviting people to your video meeting and scheduling it. So now let’s go over ways to enhance your invite and prepare for your meeting.
1. Fine-tune your meeting time
Before you click the Save button: There’s a tool you can use to find out if a particular meeting time works for all the people you want to invite. When you’re composing your invite, click Scheduling Assistant at the top of the fill-out form.
Along the left side of the panel that appears is a list of all the required and optional attendees you’re inviting. To the right is an hourly timeline for the day you picked to hold your meeting. Color coding on this timeline indicates when someone you invited will be busy or free throughout the day according to their Outlook calendars.

Use the Scheduling Assistant to make sure everyone you’ve invited is available to attend your meeting. (Click image to enlarge it.)
By referring to this timeline, you can find a date and time when all of your invitees will be able to attend your video meeting. Click on the column for a period of time to change your meeting’s start and end times. You can also scroll ahead through the days in the timeline to see if another day has fewer scheduling conflicts for the people you’re inviting.
If at least one of your invitees is unavailable for a meeting time you’ve selected, Teams will automatically suggest alternate times, if any are available. These appear below the start and end times that you set for your meeting. Click one of the suggested times to replace the start and end times that you originally chose.
2. Share your meeting’s agenda
When you’re scheduling your meeting, it can be helpful to include your meeting agenda so invitees know what will be discussed and can prepare appropriately.
At the bottom of the fill-out form for a new meeting, you can add a message to include in the meeting invite. This is a good place to include a brief meeting agenda (especially in an easy-to-read format, such as a table or a bulleted list). We suggest that you don’t make the agenda too long, since that might make it hard for recipients to find the link to join the meeting in the invitation email.

Providing a brief meeting agenda helps invitees prepare for the meeting. (Click image to enlarge it.)
If you need to provide a more detailed agenda, you can send a separate email with a document (such as a .docx or PDF file) attached. Or consider hosting your meeting in a Teams channel as described below. There you can post a reply to the message that announces your meeting with the agenda attached.
3. Host your meeting in a team channel
In most cases you’ll probably want to invite specific people to your meeting. But you can set up an “open” meeting that’s announced in a team channel. This can be handy if, for instance, you’ve created a channel in Teams for a specific project and you want everybody working on this project to attend the meeting.
As you’re going through the fill-out form for scheduling your meeting, click inside the Add channel box, and from the drop-down menu that appears, select a team and a channel within that team. You don’t need to add members of this channel as individual attendees, but you can optionally invite additional attendees who aren’t members of the channel.

Hosting a meeting in a channel lets any member of the channel join the meeting. (Click image to enlarge it.)
Another way to do this: Go to the team channel where you want to announce this meeting. At the upper-right corner, click the down arrow next to the Meet button. From the menu that opens, select Schedule a meeting . The fill-out form for a new meeting will appear in the main window with the Add channel box already filled in with the name of the channel that you’re in.
When you’ve finished filling out the new meeting form, click the Send button in the upper-right corner. Your scheduled meeting will be posted to the channel’s Posts tab. Members of the channel will get a notice of your meeting announcement, and they can reply to this post with background information or requests for the meeting. You can reply and attach a detailed agenda as a document by clicking the paperclip icon.

The meeting information appears in the channel’s Posts tab. (Click image to enlarge it.)
4. Test and configure your computer hardware
If it’s your first time leading a Teams video meeting on your current computer, do a test call to ensure that your device works correctly with Teams. You might need to grant permission to Teams to access your device’s camera, microphone, and/or speakers, and also to allow screen sharing on your device. Recent versions of macOS, for instance, require you to grant some permissions in System Preferences.
To test your device, click the Teams icon on the left toolbar. Then at the upper right, click the Meet button. On the video meeting panel that opens, click the Join now button on the lower right. The meeting window will open, and Teams should pop up a message asking for permission to access the camera, mic, and/or speakers if needed. (If you don’t get such a request but you can’t see or hear yourself, you probably need to grant these permissions anyway.)
If you plan to share your screen during the meeting, click the icon of an upward arrow inside a square in the meeting controls toolbar along the top of the screen. This will open a panel that lets you share your screen, an app window, or other content. If Teams needs permission to share your screen, it should pop up a message requesting this access.
If you’re using a Mac, the permission messages Teams pops up should take you to System Preferences > Security & Privacy > Privacy , or you can navigate there manually. On the left side of the screen, click Camera , then find the Microsoft Teams checkbox on the right and make sure it’s checked. Find Microphone , Accessibility , and Screen Recording in the list on the left and check the Microsoft Teams boxes for them as well. You’ll need to restart Teams before the changes take effect. (Marquette University offers more details and troubleshooting tips .)

If you use a Mac, you might need to head to System Preferences to grant Teams permission to use the camera and microphone and share your screen.
Likewise, if any of your invitees are new to video meetings with Teams, request that they arrive 10 minutes early. You can start the meeting early so they can get their device working properly before the meeting’s scheduled start time.
5. Practice PowerPoint presentations with the Speaker Coach
This is actually a feature in PowerPoint, but it’s great preparation for presenting during a Teams meeting: As you practice giving your presentation by speaking aloud and clicking through the slides, Speaker Coach listens to and watches you through your PC’s camera. It gives you real-time tips (as banner notices that pop up along the top center of the screen) on how to improve your performance, such as the words you choose to say, your pace, and even your expressions and body language.
Microsoft plans to implement a version of Speaker Coach for use during Teams meetings sometime in spring 2022. But in the meantime, you can still use it as a way to practice giving a PowerPoint that you will present to others in a Teams video meeting.
To access Speaker Coach: Open your presentation in PowerPoint. On the toolbar along the top of the screen, click Slide Show and from the menu that opens select Rehearse with Coach .

Speaker Coach listens to your PowerPoint presentations and offers suggestions for improvement. (Click image to enlarge it.)
6. Optionally turn off attendees’ cameras and/or mics
If you’re conducting a video meeting with many attendees, you may want to prevent attendees from turning on their cameras and mics. This can improve call quality and minimize distractions so that you’re the only one speaking or being seen.
To turn off cameras and mics before the meeting begins, open a meeting from the calendar in the Teams app and click Meeting options . (If you don’t see it, click the three-dot icon in the toolbar and then select Meeting options .) In the “Meeting options” pane that opens, turn off the Allow mic for attendees? and Allow camera for attendees? switches and click Save .
You can also do this after you’ve joined the meeting: On the toolbar along the top of the video chat panel, click the Show participants button, which will open a panel along the right side. At the top of this Participants panel, click the three-dot icon and select Disable mic for attendees or Disable camera for attendees .

In large meetings, disabling attendees’ mics and cameras can improve sound and video quality. (Click image to enlarge it.)
You can also prevent a specific person from turning on their camera or unmuting their mic. On the Participants panel, click the three-dot icon next to the person’s name and select Disable mic or Disable camera .
During the meeting
7. use background blur or a background image.
During a video meeting, a professional appearance is important — and that includes what appears behind you on camera. The background blur feature does just what it says: blurs the background behind you. Alternatively, Teams provides a selection of “virtual background” images you can choose to appear behind you. Using background blur or a background image can help make you stand out, and other attendees won’t be distracted by whatever is behind you.
(Note: If you don’t see the option to change your background, then Teams doesn’t presently support the webcam model that is in your laptop or connected to your PC.)
To turn on a background effect before you join a scheduled meeting: Along the bottom of the video preview that shows you on camera, click the Background filters icon. On the panel that opens, select Blur to blur your background, choose one of the provided background images, or click Add new to upload an image file (in .BMP, .JPG, or .PNG format) that’s stored on your PC or in your OneDrive account to use as your background.
To turn on a background effect when you’re already in a meeting: On the meeting controls toolbar along the top of the screen, click the three-dot icon to open the More actions menu, then select Apply background effects . You’ll see the panel described above. Click Preview to see what the new background effect will look like before other attendees see it behind you. Click Apply to set your chosen background effect; then the other attendees will see it behind you.

You can use background blur or a background image for a professional appearance in a meeting. (Click image to enlarge it.)
8. Screen-share, don’t overshare
If you need to share information from an application running on your PC (for example, a spreadsheet in Excel) to the attendees of your meeting, you can share a window showing only that application and not the rest of your desktop. This helps protect your privacy, as attendees won’t see your other, personal information that may happen to be elsewhere on your desktop, such as an opened calendar or email application.
To share an application window: On the meeting controls toolbar along the top of the Teams meeting screen, click the icon of an up-pointing arrow inside a square. On the panel that opens, thumbnails of applications that are presently running on your PC appear under the Window category. Click the thumbnail of the app that you want to share with the attendees in your meeting.

To share just one application window instead of your entire screen, select Window and choose the app window you want. (Click image to enlarge it.)
From this panel you can also share a PowerPoint presentation; a document, PDF, or image file that’s stored on your PC or in your OneDrive account; or an item captured via your webcam, such as a book or paper document. You can also open a virtual whiteboard that you and the other meeting attendees can collaborate on. (For more about these options, see “ The 10 best new Microsoft Teams meeting features .”)
9. Take advantage of transcriptions or live captions
If anybody in your meeting is hard of hearing, not fluent in the language being spoken, or having trouble hearing the audio for another reason, Teams has a live transcription feature that can help them follow the conversation better. It automatically converts speech into text in real time; the conversation appears with speaker attribution in a Transcript sidebar at the right side of the Teams app. After the meeting, the complete transcript will be available for download in the meeting event on the calendar.

A live meeting transcript can help participants keep up with everything that’s been said in a meeting. (Click image to enlarge it.)
To turn on live transcription: While you’re in a meeting, on the meeting controls toolbar along the top of the screen, click the three-dot icon to open the More actions menu, then select Start transcription . Alternatively, if you record a meeting (see the following tip), live transcription will automatically be turned on at the same time.
The live transcription feature is available only with a business or enterprise Microsoft 365/Office 365 account, and it must be enabled by a Teams administrator.
An alternative feature that anybody can use is live captions. Like live transcription, it converts speech into text in real time — in this case in the form of captions that appear below the video feed. These captions show only two lines of text at a time and do not persist after the meeting, making them less useful than transcriptions.
To turn on live captions: In a meeting, click the three-dot icon in the meeting controls toolbar to open the More actions menu, then select Turn on live captions . Each person must turn on the captions feature for themselves.
You can use both live transcription and live captions in a language other than English: Click the three-dot icon that appears to the right of a caption, select Change spoken language , and select a different language (33 others are available, including Mandarin, French, German, and Spanish). Note: Everyone in the meeting should be speaking the same language – these features can only be set to recognize and transcribe one spoken language at a time.
10. Record your meeting
It’s easy to miss important points during a meeting, but you can easily record your meeting. You and other team members will be able to watch this recording, which includes audio, video, and screen-sharing activity) after the meeting has concluded. Along with the transcription, the recording can be useful for those who missed your meeting or for anyone who needs to go back over what was discussed in the meeting.
The recording will be stored in your own OneDrive account, inside a folder named Recordings . But if the meeting was scheduled or started inside a Teams channel, then both the recording and transcription will be stored in your organization’s SharePoint.
To record your meeting: On the meeting controls toolbar along the top of the screen, click the three-dot icon to open the More actions menu, then select Start recording . This automatically starts live transcription (if it’s enabled) at the same time. The other meeting attendees will see a banner informing them that the meeting is being recorded and transcribed.

Recording the audio and video for a meeting can help you and others review what was covered later on. (Click image to enlarge it.)
You can stop recording by clicking the three-dot icon and selecting Stop recording . The recording will then be saved to your OneDrive or to your organization’s SharePoint. You and others who were invited to the meeting will be able to watch the video. (We’ll cover how to do this below.)
11. Take meeting notes
It’s not uncommon in meetings for important points to be raised or action items to be decided — and then promptly forgotten once the meeting’s over. To help track these items, you or another attendee can take notes that will be saved as part of the meeting. They’ll be easily accessible for review later in Teams.
To take notes during a meeting: On the meeting controls toolbar along the top of the video meeting panel, click the three-dot icon to open the More actions menu, then select Meeting notes . A Meeting Notes panel appears at the right side of the meeting window. Click the Take notes button, and you’re taken to the main Teams desktop app, where a tab titled “Meeting Notes” will be opened in the chat thread for your meeting. In the main window of the Meeting Notes tab, click on the line that says Notes and type in a new section name. Then click on the line that says Capture meeting objectives… and start typing in a note.
When your cursor is in the notes area, a formatting toolbar appears near the top of the window that lets you apply bold, italic, highlighting, numbered and bulleted lists, and other formatting to your text. Click the + icon in the main note area to add a section headline. You can create as many sections as you need. If you want to rearrange the order of these sections, click the three-dot icon to the right of a section title and select Move up or Move down .

Taking meeting notes allows you to store important points and action items from a meeting right in the meeting chat or team channel. (Click image to enlarge it.)
12. Use keyboard shortcuts for quick meeting actions
During a meeting, it can be helpful to use keyboard shortcuts. You can perform actions quickly without distracting your attendees or yourself from what someone is saying. Instead of fiddling around the Teams interface to turn off your mic if you’re not speaking for a while, for example, just press the Ctrl + Shift + M keys ( Command + Shift + M on a Mac).
Other shortcuts that can be very useful during a meeting:
- Ctrl + Shift + P (macOS: Command + Shift + P ) to turn on/off background blur
- Ctrl + Shift + Y (macOS: Command + Shift + Y) to allow people waiting in the virtual lobby into the meeting
- Ctrl + Shift + E (macOS: Command + Shift + E ) to start screen sharing
You can view the complete list of shortcuts in Teams by typing the Ctrl + period keys (macOS: Command + period ) or see the ones that are specifically used during meetings on Microsoft’s Keyboard shortcuts for Microsoft Teams page.
Before your next meeting, commit to memorizing the shortcuts that you are likely to use during the meeting, or just write them down on paper and have this on your desk.
After the meeting
When your meeting ends, a new chat thread for it will be automatically posted in the chat section of your Teams app. This lets you and others in your team engage in a follow-up chat and access information about the finished meeting.
Making sure that your meeting attendees can review the video recording, transcription, and meeting notes for the concluded meeting will help clarify what was discussed and ensure that action items aren’t forgotten.
13. Review the meeting recording and/or transcript
If you recorded a meeting, you and others who were invited to the meeting can access the recording by clicking Chat on the left toolbar of the Teams window. In the second column, find and click the listing for your concluded meeting. In the main window, you’ll find the video file of your recorded meeting posted as a message. You can play it from inside the Teams app by clicking its name.
The meeting transcription appears as a separate message in the same chat. Click the three-dot icon in the message’s upper-right corner and select download as .docx to download the transcript as a Word file or download as .vtt to download it as a Web Video Text Tracks format file.
If the video meeting was started from a Teams channel, click Teams on the left toolbar. In the second column, click the channel where you originally posted an announcement for the meeting. In the main window, you’ll find the video file and transcription of your recorded meeting posted as a message. (If not, make sure the Posts tab is selected at the top of the main window.) You can play the video recording from inside the Teams app by clicking its name; download the transcript by clicking the three-dot icon and selecting a download format.

Meeting recordings appear as messages in a chat or team channel. (Click image to enlarge it.)
To share a web link to the video file: Click the three-dot icon to the right of the video’s file name, and on the panel that opens, select Copy link . You can then paste this link inside an email, instant message, etc. The person who receives your link can click it to watch the recording of your video meeting.
(Note: Only the person who recorded the meeting can share it with people who weren’t originally invited to the meeting.)
14. Review and share the meeting notes
If you took meeting notes, you and the other attendees can access them by clicking Chat on the left toolbar and selecting the new chat thread that was posted for your concluded meeting. At the top of the main window, click the Meeting Notes tab.
If the video meeting was started from a Teams channel, click Teams on the left toolbar. In the second column, click the channel where you originally posted an announcement for the meeting. At the top of the main window, click the Meeting Notes tab.
If you or another attendee took notes using a different tool, such as Microsoft Word, you can attach the document file in a reply message to the chat thread that was automatically posted in the Chat section of Teams for your concluded meeting. Or, if the video meeting was started from a channel, attach the meeting notes to a message reply in the conversation thread that you posted to originally announce your meeting.
This article was originally published in May 2020 and updated in June 2022.
Related content
Microsoft teams app now supports both work and personal accounts, bowing to pressure, microsoft extends lifeline for office 365 connectors in teams, retirement of office 365 connectors in teams not sitting well, microsoft's bundling of teams may have violated eu antitrust rules, from our editors straight to your inbox.
Howard Wen ( www.howardwen.com ) is a longtime contributor to Computerworld . He specializes in explainer guides, how-tos, and reviews of office applications and productivity tools.
More from this author
Microsoft loop cheat sheet, microsoft copilot can boost your writing in word, outlook, and onenote — here’s how, the best new slack features for business, make slack’s design update work for you, microsoft onedrive cheat sheet: using onedrive for web, google spaces cheat sheet: how to get started, microsoft onedrive cheat sheet: using onedrive in windows, google sheets power tips: how to use dropdown lists, most popular authors.

Show me more
Character.ai founder to co-lead gemini ai, says report.

5 steps to repair Microsoft Office

I've got the genAI blues

Podcast: End users need to switch their data security strategy

Podcast: Is the gold rush for AI talent slowing down?

Podcast: Google loses antitrust, and the world yawns

Why the AI money spigot is slowing down

Tech news roundup: The hackers are winning, it's time to switch security strategy

Is there still a gold rush for AI talent?

This browser is no longer supported.
Upgrade to Microsoft Edge to take advantage of the latest features, security updates, and technical support.
Fix screen sharing video display lag issue in Teams
- 5 contributors
- Applies to: Microsoft Teams
During a call in Microsoft Teams, when you share a video or other content that requires a higher frame rate for optimal viewing, the display for the other attendees appears to lag and frames are intermittently dropped.
By default, the frame rate for screen sharing in Teams is set to a low frame rate. This is because commonly shared content, such as an Excel workbook or Word document, is static. The low frame rate makes sure that attendees see the highest possible resolution of the shared content.
However, the default setting can be problematic when a user shares a video. The video may appear to lag because of the low frame rate.
In Teams 1.6.00.12455 and later versions, you can use a keyboard shortcut to enable high-motion screen sharing. Follow these steps:
Start sharing your screen in Teams.
Select the Teams app, and then select Ctrl+Alt+Shift+T .
The resolution of the shared content might drop to accommodate the higher frame rate. This depends on several factors, such as device capability and available bandwidth.
The keyboard shortcut will be deprecated soon. There is a new presenter control toolbar that enables a user to optimize for video when screen sharing. For more information, see Share content in Microsoft Teams meetings .
More information
After you run the keyboard shortcut, you won't see any visual indication that high-motion viewing is enabled for you. The keyboard shortcut is a toggle. If you use it two times, the Teams app will return to the default behavior of not forcing high-motion screen sharing.
To check the frame rate for the content that's shared, follow these steps:
In the Teams meeting, select the More menu option.
On the More menu, select Settings , and then select Call health .
To see the frame rate, resolution, and other details about the screen-sharing session, scroll to the Screen Sharing section.
Was this page helpful?
Additional resources

Set the 'play' options for a video in your presentation
You can use the playback options in PowerPoint to control how and when a video appears in your presentation. You can play a video in full screen mode or resize it to dimensions that you specify. You can also control the volume, play the video repeatedly (in a loop), and show the media controls.
These Play options aren't available for online videos, such as YouTube videos. They are only available for videos inserted from your computer, network, or OneDrive.
To control how your video plays, use options on the Playback tab of the PowerPoint ribbon. This tab appears on the ribbon when a video is selected on a slide.

(These options for a video are available after you embed or link to a video file from your computer .)
Play a video in the click sequence, automatically, or when clicked
Important: Set this option before adding any animations or triggers to your video. By changing this option, you will remove any animations that are associated with your video.
In Normal view, click the video frame on the slide.
On the Playback tab, in the Video Options group, from the Start list, select an option:

| Option | When the video plays during a slide show |
|---|---|
|
| The video plays automatically when the slide appears. |
| or | The video only plays when you click within the video frame. |
|
| The video plays in sequence with other actions you've programmed on the slide (such as animation effects). This option doesn't require a literal click. You can trigger the video to begin with a clicker or any other mechanism that activates the next action on the slide (such as pressing the right arrow key). |
Tip: While a video is playing, you can pause it by clicking it. To resume playing the video, click it again.
Play a video full screen
You can play a video so that it fills the entire slide (screen) when you deliver your presentation. Depending on the resolution of your original video file, it might appear distorted when you enlarge it. Always preview your video before you include it in your presentation so that if the video appears distorted or blurry, you can undo the full screen option.
If you set the video to be displayed full screen and it is also set to start automatically, you can drag the video frame off the slide into the gray area so that it will not be visible on the slide or flash briefly before the video goes to full screen.
In Normal view, click the video frame on the slide that you want to play full screen.
Under Video Tools , on the Playback tab, in the Video Options group, select the Play Full Screen check box.
Resize a video
If you don't want to play a movie full screen, you can resize it to the dimensions that you want.
In Normal view, select the video that you want to resize.
Do one of the following:
To adjust the formatting:
Click a corner sizing handle until you see a two-headed arrow, and then drag to size the frame.

To keep the center of the video in the same place, hold down Ctrl while dragging. By default, this maintains the proportions (locks the aspect ratio) of the video as you drag.
The default aspect ratio for presentations in PowerPoint is 16:9. If the aspect ratios of the presentation and the video differ, your video will look distorted when it plays.
To specify precise height-to-width proportions of a video:
Click Size , and then under Scale , select the Lock aspect ratio check box.
Under Size and rotate , enter sizes in the Height and Width boxes, or under Scale , in the Scale Height and Scale Width boxes, enter the percentage of size that you want, relative to the video's original size.
Tip: To prevent videos from skipping when they are played, under Scale , select the Best scale for slide show check box.
Preview a video
In Normal view, click the video frame.
Click Play .
There is also a Play option in the Preview group, on both the Format and Playback tabs, under Video Tools .
Set the volume of a video
Under Video Tools , on the Playback tab, in the Video Options group, click Volume , and then choose one of the following:
Tip: You can also set the volume by using the volume slider on the play control bar.
Hide a video when not playing
While delivering your presentation, you can hide your video until you are ready to play it. However, you should create an automatic or triggered animation to initiate playback or you will never see the video play during the slideshow. For more information about creating an automatic or triggered animation, see Animate text or objects .
Under Video Tools , on the Playback tab, in the Video Options group, select the Hide While Not Playing check box.
Loop a video
To play your video repeatedly and continuously during your presentation, you can use the loop feature.
Under Video Tools , on the Playback tab, in the Video Options group, select the Loop until Stopped check box.
Rewind a video after playing
To rewind your video after playing during your presentation, do the following:
Under Video Tools , on the Playback tab, in the Video Options group, select the Rewind after Playing check box.
Show the media controls
To show the media controls during your presentation, do the following:
On the Slide Show tab, in the Set up group, select the Show Media Controls check box.
Create a self-running presentation
Turn your presentation into a video
Add and play sounds in a presentation
Set the timing and speed of a transition

Need more help?
Want more options.
Explore subscription benefits, browse training courses, learn how to secure your device, and more.

Microsoft 365 subscription benefits

Microsoft 365 training

Microsoft security

Accessibility center
Communities help you ask and answer questions, give feedback, and hear from experts with rich knowledge.

Ask the Microsoft Community

Microsoft Tech Community

Windows Insiders
Microsoft 365 Insiders
Was this information helpful?
Thank you for your feedback.
COMMENTS
Hit Share and then copy that direct link. Now, back in PowerPoint, I'll follow the same steps from earlier. Click insert, then Online Video and I'll paste in that URL from Stream, hit Insert again, and then stretch it to cover the full size of the slide, and then I'll try it out.
To present content in a meeting: Select Share in your meeting controls. Choose to present your entire screen, a window, a PowerPoint file, or a Whiteboard. Select Stop sharing in your meeting controls when you're done. Note: In Teams for web, you can share your screen using Google Chrome or the latest version of Microsoft Edge.
To share sound from your computer: Select Share in your meeting controls. Turn on the Include sound toggle. When you share, all audio from your computer, including notifications, will be heard by participants in the meeting. Note: Teams and your computer need to be set to the same speaker. Adjust your computer's audio output in your system ...
Learn how to play a video from PowerPoint with audio in Teams. In this tutorial we will embed a video into PowerPoint and play this back with audio in a Team...
Need to present a video to a group of people online, but when you play it on your computer and share your desktop, it's laggy and dropping frames for others ...
In this step-by-step tutorial, learn how to properly play video and audio in Microsoft Teams meetings. Oftentimes, when you play video or music, your audienc...
Copy the URL from the slide and paste it into the browser tab address bar. Start the video on the YouTube website. Let the video play through any ads that are at the start of the video. Pause the video and move the marker to the start of the segment you will show during the presentation. Use the time codes on the slide as a reference.
Present your slides. If you're already in a Teams meeting, select Share and then under the PowerPoint Live section, choose the PowerPoint file you're wanting to present. If you don't see the file in the list, select Browse OneDrive or Browse my computer. If your presentation is already open in PowerPoint for Windows or Mac, go to the file ...
It is good also to note that if you hit "play" it doesn't reflect to attendees (=they need to play the video themselves) Teams Desktop: sharing a Whiteboard ... A PowerPoint presentation from any Team and channel you belong to! Choose a PowerPoint presentation you opened or edited most recently (as you notice compared to other examples ...
To apply video filters, go to the Device Settings panel > Video Settings, then turn on the toggle next to your desired filter. Soft focus filter. Change your view Gallery. Gallery is the default view during a Teams meeting. On Teams for desktop, you can customize how you see your and other people's video during a meeting.
Your camera full screen with a bottom 3rd (your name) sliding onto the screen. A video playing the demo of the new features. The web page showing the project plan. If you'd like to see how this is done, the video above shows it in action! Xsplit isn't free, but also isn't expensive ($200 for lifetime).
Sometimes, the video sound can overpower your voice. 8. **Test with a Different Video/Platform**: - Try playing a different video or using a different platform (e.g., playing a video file from your computer instead of streaming from YouTube) to see if the issue is specific to a particular video or service. 9.
If you want to include a video clip from YouTube in your PowerPoint presentation delivered in a Microsoft Teams meeting, this video will show you how to play...
The seven options are: Share your entire screen/desktop. Share the Slide Show window. Share the editing window with a clean look. Run the Slide Show in a window and share that window. Use the PowerPoint sharing option in Teams. Use Presenter View to show the audience your slides while you see Presenter View. Present with your video beside your ...
Give the feature a try next time you need to present in a Teams meetings: Join a Teams meeting or an ad-hoc Teams call. Open your presentation in PowerPoint for Windows. Click the Present in Teams button in the top right corner. Scenarios to try. Ready to take the PowerPoint Live feature for a spin? Try some of the scenarios below. As a presenter:
The meeting information appears in the channel's Posts tab. (Click image to enlarge it.) 4. Test and configure your computer hardware. If it's your first time leading a Teams video meeting on ...
In Teams 1.6.00.12455 and later versions, you can use a keyboard shortcut to enable high-motion screen sharing. Follow these steps: Start sharing your screen in Teams. Select the Teams app, and then select Ctrl+Alt+Shift+T. The resolution of the shared content might drop to accommodate the higher frame rate.
Microsoft Teams has recently introduced Presenter modes that allows you to put your video on top of or beside a screen or window that you share in a Teams meeting. This seems to work regardless of whether you share a window or a screen and the content can be slides, a browser, or any other content.
Use a presenter mode. After your meeting starts, at the upper-right corner of Teams, select Share content to choose a Presenter mode and other options. Meeting presenter modes and options. Under Presenter mode, choose the mode that you want. Also, be sure that your camera is turned on. Before starting the presentation, select Customize and ...
On the Playback tab, in the Video Options group, from the Start list, select an option: Option. When the video plays during a slide show. Automatically. The video plays automatically when the slide appears. On Click or When Clicked On. The video only plays when you click within the video frame. In Click Sequence.
Share your screen and select to include system audio, then you can play the video and other participants in the meeting will hear the audio from that video. This is currently only available with the Windows Teams client.